This guide will walk through rolling back .NET Windows Services and .NET Web Applications hosted on IIS. It will use the OctoFX Sample Application. That application has three components:
- Database
- Windows Service
- Website
Rolling back a database is out of the scope of this guide. As stated in this article, rolling back a database schema change could result in wrong or deleted data. This guide focuses on scenarios where there were no database changes or the database changes are backward compatible. Because the database changes are out of scope for rollbacks, the database packages will be “skipped” during the rollback process.
Existing deployment process
For this guide, we will start with the following deployment process for the OctoFX application:
- Run Database Creation Runbook
- Deploy the OctoFX database
- Deploy the OctoFX Windows Service
- Deploy the OctoFX website
- Verify the application
- Notify stakeholders
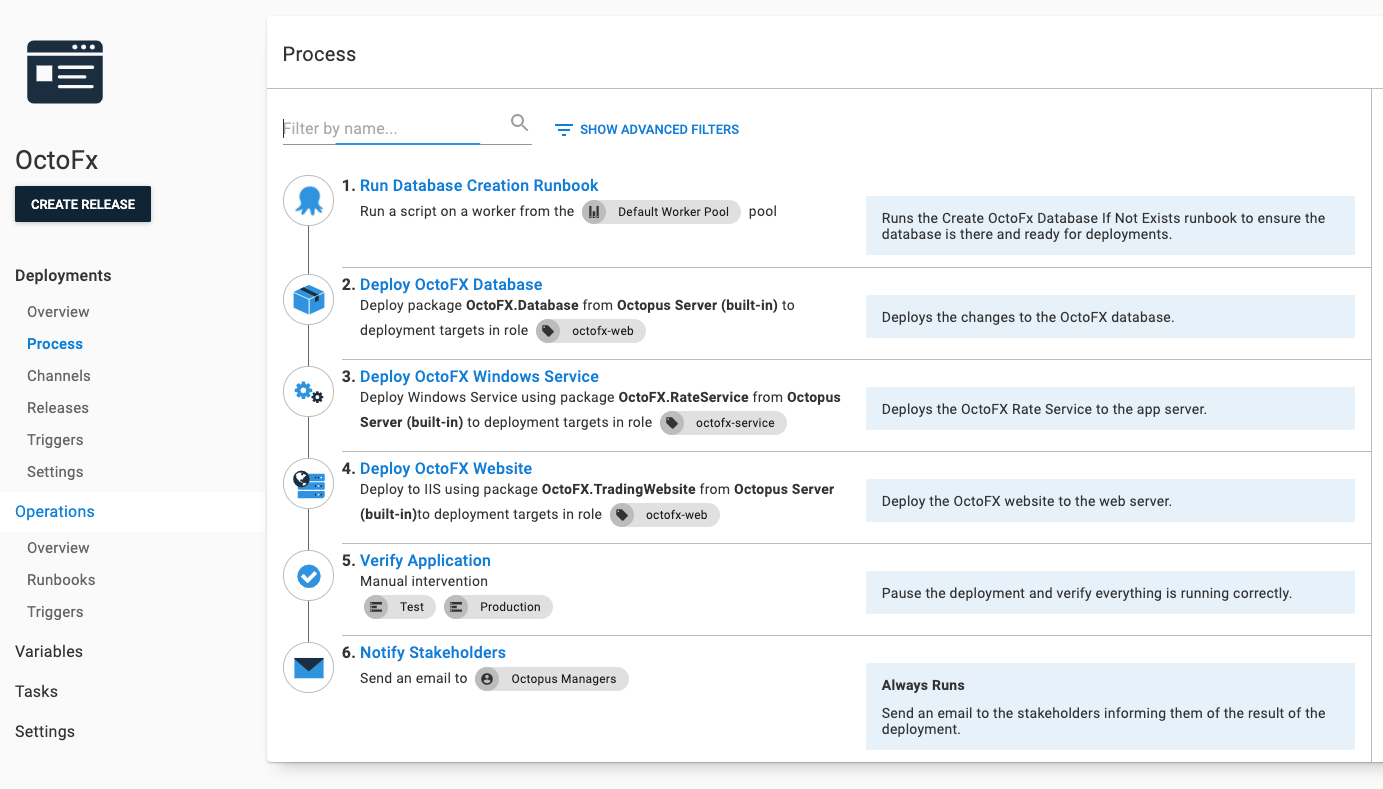
View the deployment process on our samples instance. Please login as a guest.
Zero configuration rollback
The easiest way to rollback to a previous version is to:
- Find the release you want to roll back.
- Click the REDEPLOY button next to the environment you want to roll back.
That redeployment will work because a snapshot is taken when you create a release. The snapshot includes:
- Deployment Process
- Project Variables
- Referenced Library Variables Sets
- Package Versions
Re-deploying the previous release will re-run the deployment process as it existed when that release was created. By default, the deploy package steps (such as deploy to IIS or deploy a Windows Service) will extract to a new folder each time a deployment is run, perform the configuration transforms, and run any scripts embedded in the package.
Zero Configuration Rollbacks should work for most our customers. However, your deployment process might need a bit more fine tuning. The rest of this guide is focused on disabling specific steps during a rollback process.
Simple rollback process
The typical rollback strategy is to skip specific steps and run additional ones during a rollback. In this example, the database steps will be skipped with another step to prevent that release from progressing will run during a rollback.
The updated deployment process will be:
- Calculate Deployment Mode
- Run Database Creation Runbook (skip during rollback)
- Deploy the OctoFX Database (skip during rollback)
- Deploy the OctoFX Windows Service
- Deploy the OctoFX Website
- Block Release Progression (only run during rollback)
- Verify the Application
- Notify stakeholders

View the deployment process on our samples instance. Please login as a guest.
Calculate deployment mode
Calculate Deployment Mode is a community step template created by Octopus Deploy. It compares the release number being deployed with the current release number for the environment. When the release number is greater than the current release number, it is a deployment. When it is less, then it is a rollback. The step templates sets a number of output variables, including ones you can use in variable run conditions.
Skip database deployment steps
The two steps related to database deployments, Run Database Creation Runbook and Deploy OctoFX Database, should be skipped during a rollback. Unlike code, databases cannot easily be rolled back without risking data loss. For most rollbacks, you won’t have database changes. However, a rollback could accidentally be triggered with a database change. For example, rolling back a change in Test to unblock the QA team. Skipping these steps during the rollback reduces the chance of accidental data loss.
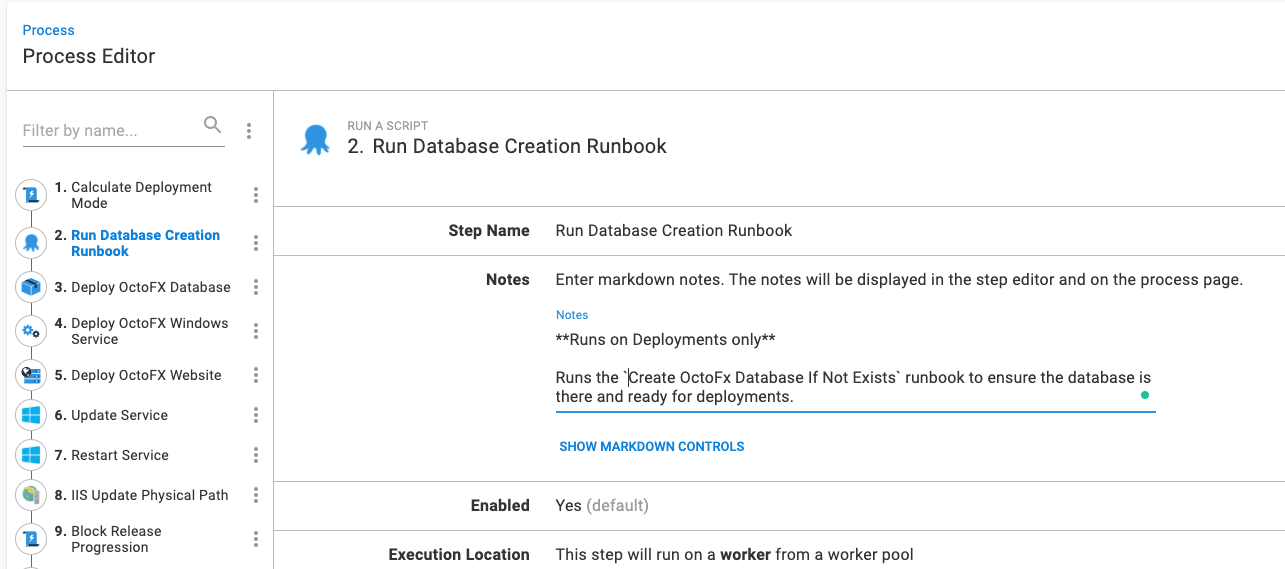
To skip these steps during a rollback, set the variable run condition to be:
#{Octopus.Action[Calculate Deployment Mode].Output.RunOnDeploy}We also recommend adding or updating the notes field to indicate it will only run on deployments.
Prevent release progression
Blocking Release Progression is an optional step to add to your rollback process. The Block Release Progression step template uses the API to prevent the rolled back release from progressing.
This step includes the following parameters:
- Octopus Url: #{Octopus.Web.BaseUrl} (default value)
- Octopus API Key: API Key with permissions to block releases
- Release Id to Block: #{Octopus.Release.CurrentForEnvironment.Id} (default value)
- Reason: This can be pulled from a manual intervention step or set to
Rolling back to #{Octopus.Release.Number}
This step will only run on a rollback; set the run condition for this step to:
#{Octopus.Action[Calculate Deployment Mode].Output.RunOnRollback}To unblock that release, go to the release page and click the UNBLOCK button.
Complex rollback process
As mentioned earlier, re-deploying the website and windows service involves re-extracting the package, running configuration transforms, and any embedded scripts. Generally, those steps will finish within 60 seconds. However, re-deploying those packages carries a small amount of risk because variable snapshots can be updated. Or, the embedded scripts are complex and take time to finish.
By default, Octopus Deploy will keep all releases on your Windows Server (this can be changed via retention policies), which means the previously extracted and configured Windows Service or Website already exists. Back in Octopus 3.x we added the system variable Octopus.Action.Package.SkipIfAlreadyInstalled. When that variable is set to True, Octopus Deploy will:
- Check the
deploymentjournal.xmlto see if the package has already been installed. - If it hasn’t been installed, then it will proceed with the deployment.
- If it is installed, it will skip the deployment but still set the output variable
Octopus.Action[STEP NAME].Output.Package.InstallationDirectoryPath.
The rollback process in this section will use that functionality to update IIS and the Windows Service registration to point to those older (pre-existing) folders.
The resulting process will be:
- Calculate Deployment Mode
- Run Database Creation Runbook (skip during rollback)
- Deploy the OctoFX Database (skip during rollback)
- Deploy the OctoFX Windows Service (with
Octopus.Action.Package.SkipIfAlreadyInstalledset toTrue) - Deploy the OctoFX Website (with
Octopus.Action.Package.SkipIfAlreadyInstalledset toTrue) - Update Windows Service Binary Path
- Restart Windows Service
- IIS Update Physical Path
- Block Release Progression (only run during a rollback)
- Verify the Application
- Notify stakeholders
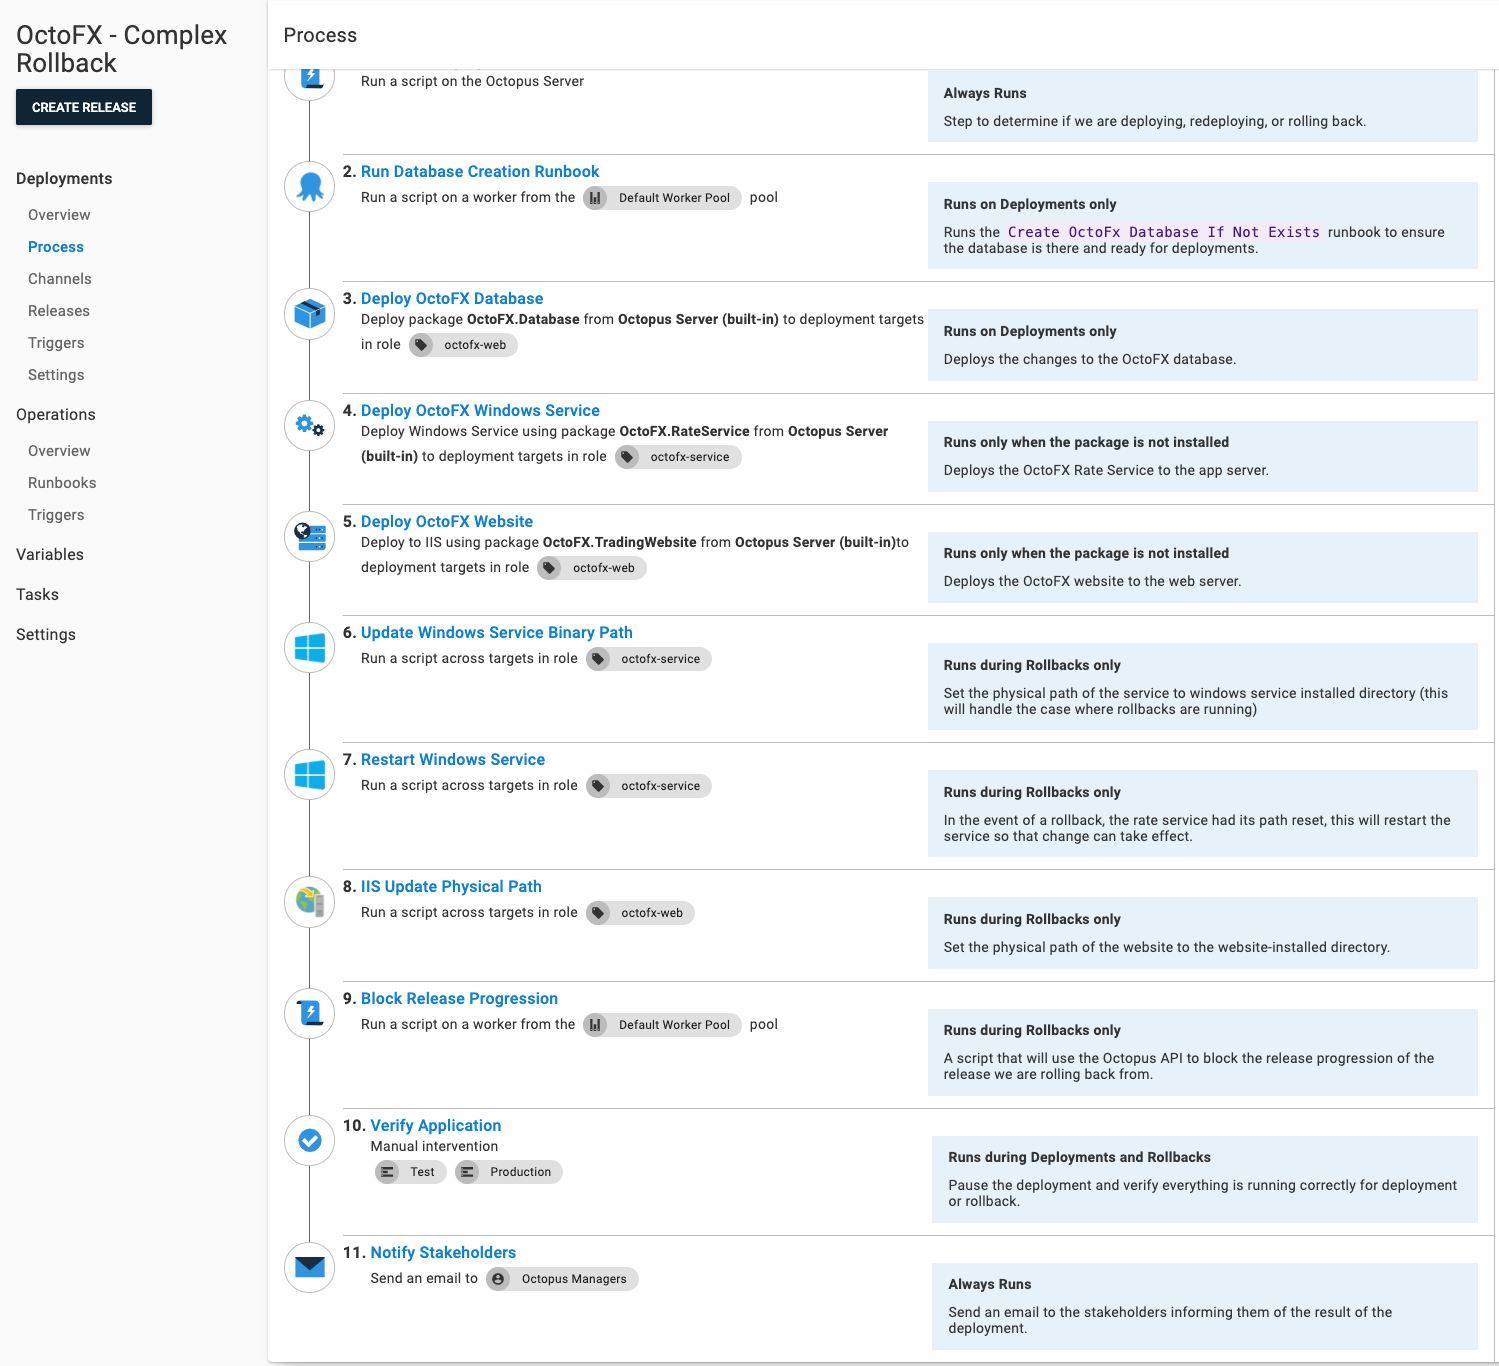
View that deployment process on samples instance. Please login as a guest.
Comparison to simple rollback process
The complex rollback process and simple rollback process have some overlap. Please refer to the earlier section on how to configure these steps.
- Add Calculate Deployment Mode step
- Update Run Database Creation Runbook to skip during rollback
- Update Deploy OctoFX database to skip during rollback
- Add Block Release Progression step
The primary difference between the simple and complex rollback process is the complex rollback process reuses the pre-existing extracted application.
Add system variable to skip package deployment
Adding the system variable Octopus.Action.Package.SkipIfAlreadyInstalled will skip already installed packages. That makes a lot of sense for rollbacks but less sense for regular deployments. To only skip package installation for rollbacks, set the variable value to be:
#{if Octopus.Action[Calculate Deployment Mode].Output.DeploymentMode == "Deploy"}False#{else}True#{/if}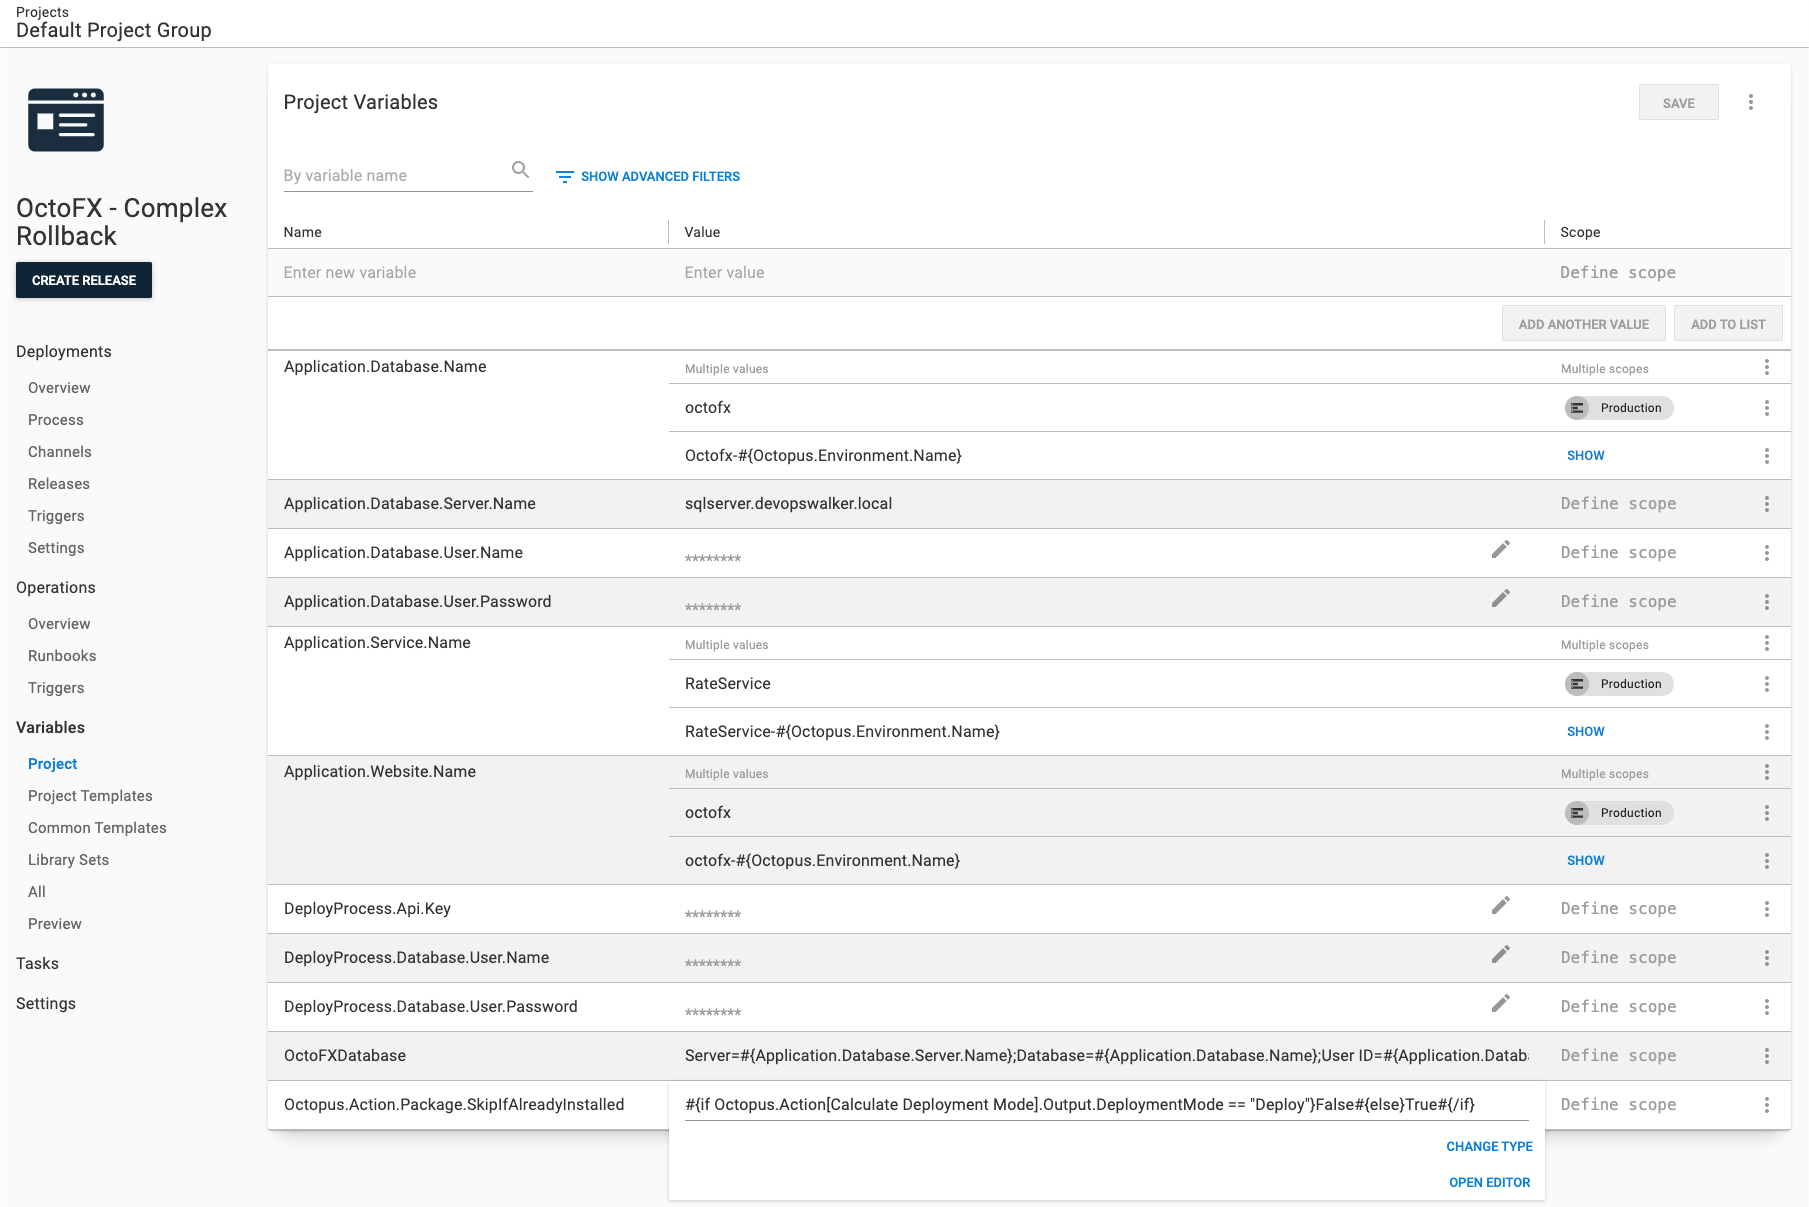
Windows Service rollback
Updating the existing Windows Service to point to an earlier version of the application involves two steps.
The binary path must include the application’s .exe file. For example, #{Octopus.Action[STEP NAME].Output.Package.InstallationDirectoryPath}\YOUREXEFILE.exe. For this guide, that value will be:
#{Octopus.Action[Deploy OctoFX Windows Service].Output.Package.InstallationDirectoryPath}\OctoFX.RateService.exeSet the run condition for this step to:
#{Octopus.Action[Calculate Deployment Mode].Output.RunOnRollback}Website rollback
In modern versions of IIS, updating the physical path is an instantaneous action. All traffic is routed to that new path. To do that, use the IIS Website - Update Property step template.
The parameters to set for this step template are:
- Web site name: The name of your website
- Name of property to set:
physicalPath - Value of property to set:
#{Octopus.Action[Deploy OctoFX Website].Output.Package.InstallationDirectoryPath}
Set the run condition for this step to:
#{Octopus.Action[Calculate Deployment Mode].Output.RunOnRollback}If you are using application pools instead of websites, use IIS AppPool - Update Property step template.
Simple or complex rollback process
We recommend starting with the simple rollback process first. That requires the least amount of changes while at the same time gives you the rollback functionality. Only move to the complex rollback process if you determine the simple rollback process isn’t meeting a specific need.
Help us continuously improve
Please let us know if you have any feedback about this page.
Page updated on Wednesday, October 4, 2023