A minor release of Octopus Deploy is when the second number in the version is incremented. For example, 2020.4.x to 2020.5.x. A patch release is when the third number is incremented, from 2020.4.1 to 2020.4.2.
Prep Work
Before starting the upgrade, it is critical to back up the master key and license key. If anything goes wrong, you might need these keys to do a restore. It is better to have the backup and not need it than need the backup and not have it. The master key doesn’t change, while your license key changes, at most, once a year. Back them up once to a secure location and move on to the standard upgrade process.
- Backup the Master Key.
- Backup the License Key.
Backup the Octopus Master Key
Octopus Deploy uses the Master Key to encrypt and decrypt sensitive values in the Octopus Deploy database. The Master Key is securely stored on the server, not in the database. If the VM hosting Octopus Deploy is somehow destroyed or deleted, the Master Key goes with it.
To view the Master Key, you will need login permissions on the server hosting Octopus Deploy. Once logged in, open up the Octopus Manager and click the view master key button on the left menu.
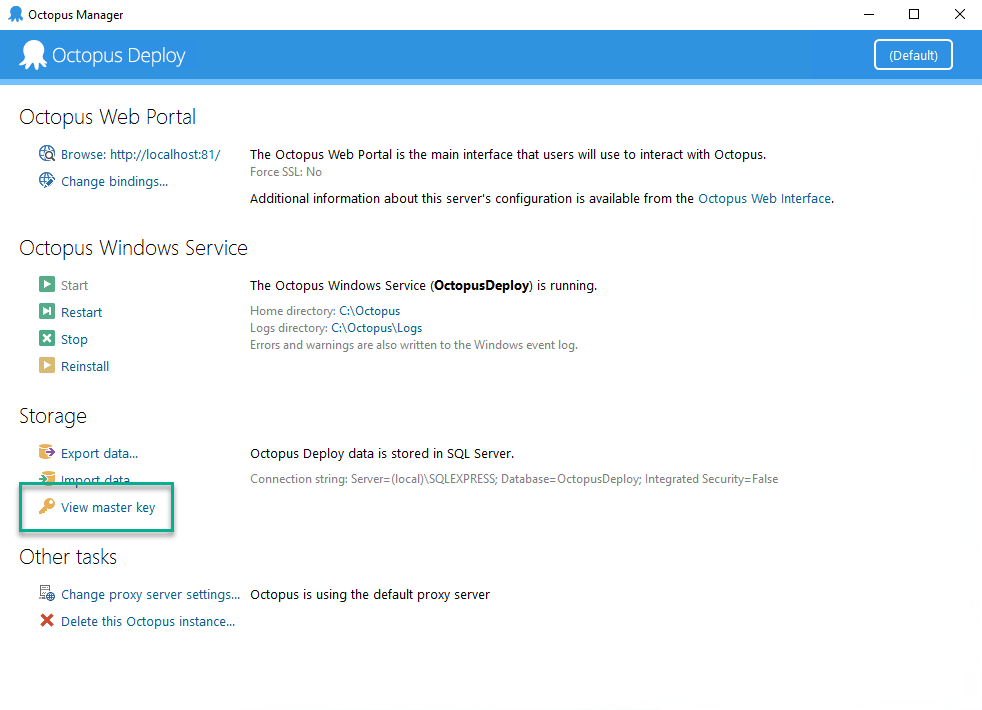
Save the Master Key to a secure location, such as a password manager or a secret manager.
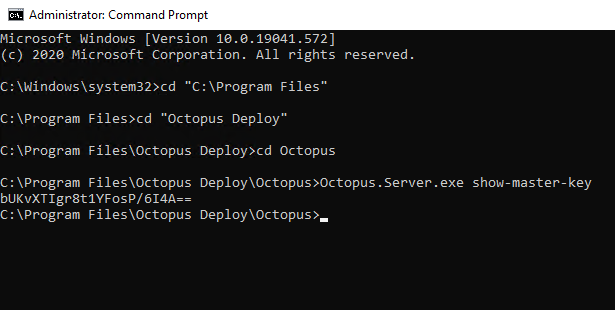
An alternative means of accessing the Master Key is to run the Octopus.Server.exe show-master-key from the command line. Please note: you will need to be running as an administrator to do that.
Backup the License Key
Like the Master Key, the License Key is necessary to restore an existing Octopus Deploy instance. You can access the License Key by going to Configuration ➜ License. If you cannot access your License Key, please contact support@octopus.com and they can help you recover it.
Standard upgrade process
The standard upgrade process is an in-place upgrade. In-place upgrades update the binaries in the install directory and update the database. The guide below includes additional steps to backup key components to make it easier to rollback in the unlikely event of a failure.
Overview
The steps for this are:
- Download the latest version of Octopus Deploy.
- Enable maintenance mode.
- Backup the database.
- Do an in-place upgrade.
- Test the upgraded instance.
- Disable maintenance mode.
Downloading the latest version of Octopus Deploy
The downloads page will always have the latest version of Octopus Deploy. If company policy dictates you install an older version, for example, the latest version is 2020.4.11, but you can only download 2020.3.x, then visit the previous downloads page.
Maintenance mode
Maintenance mode prevents non-Octopus Administrators from doing deployments or making changes. To enable maintenance mode go to Configuration ➜ Maintenance and click the button Enable Maintenance Mode. To disable maintenance mode, go back to the same page and click on Disable Maintenance Mode.
Backup the SQL Server database
Always back up the database before upgrading Octopus Deploy. The most straightforward backup possible is a full database backup. Execute the below T-SQL command to save a backup to a NAS or file share.
BACKUP DATABASE [OctopusDeploy]
          TO DISK = '\\SomeServer\SomeDrive\OctopusDeploy.bak'
             WITH FORMAT;
The BACKUP DATABASE T-SQL command has dozens of various options. Please refer to Microsoft’s Documentation or consult a DBA as to which options you should use.
Octopus Deploy components
Before performing an in-place upgrade, it is essential to note the various components of Octopus Deploy. Most in-place upgrades will only change the install location and the SQL Server database. Very rarely will an in-place upgrade change the home folder or server folders.
The Windows Service is split across multiple folders to make upgrading easy and low risk.
- Install Location: By default, the install location for Octopus on Windows is
C:\Program Files\Octopus Deploy\Octopus. The install location contains the binaries for Octopus Deploy and is updated by the MSI. - SQL Server Database: Since
Octopus Deploy 3.x, the back-end database has been SQL Server. Each update can contain 0 to N database scripts embedded in a .dll in the install location. TheOctopus Managerinvokes those database scripts automatically. - Home Folder: The home folder stores configuration, logs, and other items unique to your instance. The home folder is separate from the install location to make it easier to upgrade, downgrade, uninstall/reinstall without affecting your instance. The default location of the home folder is
C:\Octopus. Except in rare cases, this folder is left unchanged by the upgrade process. - Instance Information: The Octopus Deploy Manager allows you to configure 1 to N instances per Windows Server. The
Octopus Managerstores a list of all the instances in theC:\ProgramData\Octopus\OctopusServer\Instancesfolder. Except in rare cases, this folder is left unchanged by the upgrade process. - Server Folders: Logs, artifacts, packages, and event exports are too big for Octopus Deploy to store in a SQL Server database. The server folders are sub-folders in
C:\Octopus\. Except in rare cases, these folders are left unchanged by an upgrade. - Tentacles: Octopus Deploy connects to deployment targets via the Tentacle service. Each version of Octopus Deploy includes a specific Tentacle version. Tentacle upgrades do not occur until after the Octopus Deploy server is upgraded. Tentacle upgrades are optional; any Tentacle greater than 4.x will work with any modern version of Octopus Deploy. We recommend you upgrade them to get the latest bug fixes and security patches when convenient.
- Calamari: The Tentacles facilitate communication between Octopus Deploy and the deployment targets. Calamari is the software that does the actual deployments. Calamari and Octopus Deploy are coupled together. Calamari is upgraded automatically during the first deployment to a target.components.
Install the newer version of Octopus Deploy
Installing a newer version of Octopus Deploy is as simple as running MSI and following the wizard. The MSI will copy all the binaries to the install location. Once the MSI is complete, it will automatically launch the Octopus Manager.
Validation checks
Octopus Deploy will perform validation checks before upgrading the database. These validation checks include (but are not limited to):
- Verify the current license will work with the upgraded version.
- Verify the current version of SQL Server is supported.
If the validation checks fail, don’t worry, install the previously installed version of Octopus Deploy, and you will be back up and running quickly.
Database upgrades
Each release of Octopus Deploy contains 0 to N database scripts to upgrade the database. The scripts are run in a transaction; when an error occurs, the transaction is rolled back. If a rollback does happen, gather the logs and send them to support@octopus.com for troubleshooting. You can install the previous version to get your CI/CD pipeline back up and running.
Testing the upgraded instance
It is up to you to decide on the level of testing you wish to perform on your upgraded instance. At a bare minimum, you should:
- Do test deployments on projects representative of your instance. For example, if you have IIS deployments, do some IIS deployments. If you have Java deployments, do some Java deployments.
- Check previous deployments, ensure all the logs and artifacts appear.
- Ensure all the project and tenant images appear.
- Run any custom API scripts to ensure they still work.
- Verify a handful of users can log in, and that their permissions are similar to before.
- Build server integration; ensure all existing build servers can push to the upgraded server.
We do our best to ensure backward compatibility, but it impossible to cover every user scenario for every possible configuration. If something isn’t working, please capture all relevant screenshots and logs and send them over to support@octopus.com for further investigation.
Upgrade High Availability
In general, upgrading a high available instance of Octopus Deploy follows the same steps as a typical in-place upgrade. Download the latest MSI and install that. The key difference is to upgrade only one node first, as this will upgrade the database, then upgrade all the remaining nodes.
Attempting to upgrade all nodes at the same time will most likely lead to deadlocks in the database.
The process should look something like this:
- Download the latest version of Octopus Deploy.
- Enable maintenance mode.
- Stop all the nodes.
- Backup the database.
- Select one node to upgrade, wait until finished.
- Upgrade all remaining nodes.
- Start all remaining stopped nodes.
- Test upgraded instance.
- Disable maintenance mode.
As of 2023.2.9755, a database upgrade will abort if Octopus detects there are nodes still running. Ensure all nodes are properly shutdown and try again.
A small outage window will occur when upgrading a highly available Octopus Deploy instance. The outage window will happen between when you shut down all the nodes and upgrade the first node. The window duration depends on the number of database changes, the size of the database, and compute resources. It is highly recommended to automate your upgrade process to reduce that outage window.
Rollback failed upgrade
While unlikely, an upgrade may fail. It could fail on a database upgrade script, SQL Server version is no longer supported, license check validation, or plain old bad luck. When that happens, it is time to rollback to a previous version. Minor and patch releases are generally the easiest of the scenarios to rollback. The process will be:
- Restore the database backup.
- Download and install the previously installed version of Octopus Deploy.
- Do some sanity checks.
- If maintenance mode is enabled, disable it.
Restore backup of database
Use SQL Server Management Studio’s (SSMS) built-in restore backup functionality. SSMS provides a wizard to make this process as pain-free as possible. Be sure to consult a DBA or read up on Microsoft’s Documentation.
Find and download the previous version of Octopus Deploy
Octopus Deploy stores the installation history in the database. Run this query on your Octopus Deploy database if unsure as to which version to download:
SELECT TOP 5 [Version]
  FROM [dbo].[OctopusServerInstallationHistory]
  ORDER BY Installed desc
When you know the version to install, go to the previous downloads page.
Installing the previous version
The key configuration items, such as connection string, files, instance information, etc., are not stored in the install directory of Octopus Deploy. To install the previous version, first, uninstall Octopus Deploy. Uninstalling will only delete items from the install directory, or C:\Program Files\Octopus Deploy\Octopus. Then run the MSI to install the previous version.
Recommendation - creating a test instance
The chance of an in-place upgrade failing is low. However, there is still that chance. There might be a new feature or a breaking change introduced. We recommend creating a sandbox or test instance to test out new versions of Octopus Deploy.
Learn more about creating a test instance.
Help us continuously improve
Please let us know if you have any feedback about this page.
Page updated on Sunday, January 1, 2023