Octopus supports the deployment of Kubernetes resources through the Deploy Kubernetes containers step. This step exposes a UI that builds up a Kubernetes Deployment resource, a Service resource, and an Ingress resource. The combination of these resources represents an opinionated view about what makes up a typical Kubernetes deployment.
Deploy Kubernetes containers step
To begin, add the Deploy Kubernetes containers step to a project.
This step has three important sections that make up the combined objects that are deployed to Kubernetes.
The first section is the Deployment. This section is used to build of the Deployment resource.
The second feature is the Service. This feature is used to build a Service resource.
The third feature is the Ingress. This feature is used to build a Ingress resource.

Kubernetes terminology overlaps with a number of general concepts in Octopus. For example, Kubernetes has the notion of a Deployment, which is distinct from the act of performing a deployment in Octopus.
To distinguish between Kubernetes and Octopus terminology, we will reference Kubernetes “resources” e.g. a Deployment resource or Pod resource.
Deployment
A Deployment resource provides a declarative interface for a Pod resource and a ReplicaSet resource.
A Pod resource in turn configures one or more Containers resources. Container resources reference a Docker container image and provide all the additional configuration required for Kubernetes to deploy, run, expose, monitor, and secure the Docker container.
A ReplicaSet resource monitors the Pod resources to ensure that the required number of instances are running.
Deployment name
Each Deployment resource requires a unique Deployment Name. Kubernetes resources are identified by their names, so the name must be unique in the target namespace.
When using the blue/green deployment strategy, the name entered in this field will be used as the base for the Deployment resource name. The Octopus deployment ID will then be appended to the name to ensure the blue and green Deployment resources have unique names.
Replicas
The desired number of Pod resources is set in the Replicas field. This is the number of replicas maintained by the ReplicaSet resource. This field is optional, and will default to a value of 1.
Revision history limit
The number of revisions of the resource that Kubernetes will maintain is set in the Revision history limit field.
This field was added in Octopus 2020.6.
Progression deadline
An optional value that defines the maximum time in seconds for a deployment to make progress before it is considered to be failed. If this value is not specified, it will default to 600 seconds (or 10 minutes).
This value affects Blue/Green deployments, which will point the service to the new deployment only after the new deployment has succeeded.
Pod termination grace period
An optional value that defines how long Kubernetes will wait for the Pod resource to shutdown before it is killed. See the Kubernetes documentation for more details.
Add label
Labels are custom key/value pairs that are assigned to Kubernetes resources. The labels defined in the Deployment section are applied to the Deployment, Pod, Service, Ingress, ConfigMap and Secret resources.
The labels are optional, as Octopus will automatically add the tags required to manage the Kubernetes resources created as part of this step.
Completions
This field is used when creating Kubernetes Job resources only.
completions is an optional value to specify how many pods to be initiated, one after the other.
Parallelism
This field is used when creating Kubernetes Job resources only.
parallelism is an optional value to specify how many pods should run in parallel when the job is started.
Backoff limit
This field is used when creating Kubernetes Job resources only.
backoffLimit is an optional value that can be used to limit the number of pods creating continuously in case the job fails.
Active deadline seconds
This field is used when creating Kubernetes Job resources only.
activeDeadlineSeconds is an optional value that determines how many seconds should the job runs. The job will be terminated if it runs longer than the given time provided in this field.
TTL Seconds After Finished
This field is used when creating Kubernetes Job resources only.
ttlSecondsAfterFinished is an option value to specify when the job should be cleaned up after it is executed. This is handled by the TTL Controller. When the TTL controller cleans up a resource, it will cascade-delete, which means it deletes its dependent objects together with it.
Deployment strategy
Kubernetes exposes two native deployment strategies: Recreate and Rolling Update. When deploying containers with this step, Octopus supports a third deployment strategy called blue/green.
Deployment strategies are not applicable to Kubernetes Job resources.
Recreate deployment strategy
The first native deployment strategy is the Recreate deployment. This strategy will kill all existing Pod resources before new Pod resources are created. This means that only one Pod resource version is exposed at any time. This can result in downtime before the new Pod resources are fully deployed.
Rolling update deployment strategy
The second native deployment strategy is the Rolling Update deployment. This strategy will incrementally replace old Pod resources with new ones. This means that two Pod resource versions can be deployed and accessible at the same time but can be performed in a way that results in no downtime.
Blue/Green deployment strategy
The third deployment strategy, Blue/Green, is not a native concept in Kubernetes. It is a deployment strategy that is achieved by the Deploy Kubernetes containers step because it creates and coordinates both the Deployment resource and the Service resources.
The Blue/Green deployment strategy involves four phases.
Phase 1
The first phase is the state of the existing Deployment and Service resources.
If a previous Octopus deployment was performed, there will be both a Deployment and a Service resource created in Kubernetes. These resources have tags like Octopus.Step.Id and Octopus.Deployment.Id that identify the Octopus step and specific deployment that created the resources (these tags are added automatically by Octopus).
This existing Deployment resource is considered to be the green half of the blue/green deployment.

Phase 2
The second phase involves creating the new Deployment resource. This new resource is considered to be the blue half of the blue/green deployment. It is important to note that the new Deployment resource is a completely new resource in Kubernetes. The existing green Deployment resource is not updated.
Because the names of distinct resources must be unique in Kubernetes, Octopus will append the Octopus deployment ID to the Deployment resource name. So if the Deployment resource name was defined as my-application in the step, the resulting Deployment resource name would look something like my-application-deployment-1232.
At the end of Phase 2 there are three resources in Kubernetes: the green Deployment resource, the Blue Deployment resource, and the Service resource which is still pointing at the green Deployment resource.

Phase 3
The third phase involves waiting for the blue Deployment resource to be ready.
Octopus executes the command kubectl rollout status "deployment/blue-deployment-name", which will wait until the newly created blue Deployment resource is ready. For a Deployment resource to be considered ready, it must have been successfully created, and any Container resource readiness probes must have successfully completed.
The progression deadline field can be used to limit how long Kubernetes will wait for a deployment to be successful.
If the Deployment resource was successfully created, we move to phase 4. If the Deployment resource was not successfully created, the deployment process stops with an error and leaves the service pointing to the green Deployment resource.

Phase 4
If the Deployment resource was successfully created, Octopus will execute the final phase which involves pointing the Service resource to the blue Deployment resource, and deleting any old Deployment resources.
At the beginning of Phase 4 there are three resources in Kubernetes: the green Deployment resource, the blue Deployment resource (now completely deployed and ready to accept traffic), and the Service resource which is still pointing at the green Deployment resource.
Octopus now updates the Service resource to direct traffic to the blue Deployment resource.
Once the Service resource is updated, any old Deployment, ConfigMap and Secret resources are deleted. Old resources are defined as any Deployment resource with an Octopus.Step.Id, Octopus.Environment.Id and Octopus.Deployment.Tenant.Id label that matches the Octopus step that was just deployed, and a Octopus.Deployment.Id label that does not match the ID of the deployment that was just completed.
If the deployment fails at phase 3, the Kubernetes cluster can be left with multiple Deployment resources in a failed state. Because Deployment resources with an Octopus.Deployment.Id label that does not match the current deployment are deleted in phase 4, a successful deployment will remove all previously created Deployment resource objects.
This means failed deployments can be retried, and once successful, all previous Deployment resources will be cleaned up.

Deployment strategy summary
The choice of which deployment strategy to use is influenced by a number of factors:
- Does the deployment require no downtime?
- Can multiple versions of the Deployment resource coexist, even if different versions can not receive external traffic? This may not be possible if the act of deploying a new Deployment resource results in incompatible database upgrades.
- Can multiple versions of the Deployment resource accept traffic at the same time? This may not be possible if APIs have changed in ways that are not backward compatible.
- Do the containers resources reference other resources that can not be shared? Container resources may reference resources like volume claims that can not be mounted in multiple containers.
| Strategy | No Downtime | Multiple Deployed Versions | Multiple Accessible Versions | Require Shared Resources |
|---|---|---|---|---|
| Recreate | ||||
| Rolling Update | * | * | * | * |
| Blue/Green | * | * | * |
Wait for deployment to succeed
When using the Recreate or Rolling update deployment strategy, you have the option to wait for the deployment to succeed or not before the step completes.
A completed deployment means all liveness checks passed, the rollout succeeded and all Pod resources have been updated.
The Blue/Green deployment strategy always waits for the rollout to succeed, as this is the point at which the Service resource is modified to point to the new Deployment resource.
Volumes
Volume resources allow external data to be accessed by a Container resource via its file system. Volume resources are defined in the Volumes section, and later referenced by the container configuration.
The volumes can reference externally managed storage, such as disks hosted by a cloud provider, network shares, or ConfigMap and Secret resources that are created outside of the step.
The volumes can also reference ConfigMap and Secret resources created by the step. When created by the step, new ConfigMap and Secret resources are always created as new resources in Kubernetes with each deployment and their unique names are automatically referenced by the Deployment resource. This ensures that deployments see the data in their associated ConfigMap or Secret resource, and new deployments don’t leave old deployments in an undefined state by overwriting their data. Once a deployment has successfully completed, old Secret and ConfigMap resources created by the step will be removed.
Kubernetes provides a wide range of Volume resource types. The common, cloud agnostic Volume resource types can be configured directly by Octopus. Other Volume resource types are configured as raw YAML.
Common values
All Volume resources must have a unique name defined in the Name field.
ConfigMap
The ConfigMap Volume resource exposes the data saved in a ConfigMap resource as files in a container.
The ConfigMap name field defines the name of the ConfigMap resource that is to be exposed.
Individual ConfigMap resource values can be optionally mapped to custom files by adding them as items. The item Key is the name of the ConfigMap resource key. The item Path is the name of the file that the ConfigMap value will be placed in.
For example, consider a ConfigMap secret resource created with the following YAML.
apiVersion: v1
kind: ConfigMap
metadata:
  name: special-config
  namespace: default
data:
  special.level: very
  special.type: charm
To mount this ConfigMap as a volume, the ConfigMap name would be set to special-config.
To expose the special.level key as a file called my-special-level.txt, an item is added with the Key of special.level and a Path of my-special-level.txt.
If this Volume resource is mounted by a container under the directory /data, the file /data/my-special-level.txt would have the contents of very.
Secret
The Secret Volume resource exposes the data saved in a Secret resource as files in a container.
The Secret name field defines the name of the Secret resource that is to be exposed.
Individual Secret resource values can be optionally mapped to custom files by adding them as items. The item Key is the name of the Secret resource key. The item Path is the name of the file that the Secret value will be placed in.
For example, consider a Secret resource created with the following YAML.
apiVersion: v1
kind: Secret
metadata:
  name: my-secret
type: Opaque
data:
  username: admin
  password: MWYyZDFlMmU2N2Rm
To mount this Secret as a volume, the Secret name would be set to my-secret.
To expose the username key as a file called username.txt, an item is added with the Key of username and a Path of username.txt.
If this Volume resource is mounted by a container under the directory /data, the file /data/username.txt would have the contents of admin.
Empty dir
The Empty Dir Volume resource is used to create volume that is initially empty. The volume can be shared between containers. Some uses for an Empty Dir Volume resource are:
- Scratch space, such as for a disk-based merge sort.
- Check-pointing a long computation for recovery from crashes.
- Holding files that a content-manager Container fetches while a web server Container serves the data.
By default, Empty Dir Volumes resources are stored on whatever medium is backing the node. Setting the Medium field to Memory will create the volume in a tmpfs, or RAM-backed filesystem.
Host path
The Host path volume resource mounts a file or directory from the host node’s filesystem into your Pod. This is not something that most Pods will need, but it offers a powerful escape hatch for some applications.
For example, some uses for a Host Path Volume resource are:
- Running a Container that needs access to Docker internals; use a hostPath of
/var/lib/docker. - Running cAdvisor in a Container; use a hostPath of
/sys. - Allowing a Pod to specify whether a given hostPath should exist prior to the Pod running, whether it should be created, and what it should exist as.
The Path field is required and is set to the file or directory on the node’s host filesystem that is to be exposed to the container.
The Type field is optional and has the supported values:
| Value | Behavior |
|---|---|
| Empty string (default) is for backward compatibility, which means that no checks will be performed before mounting the hostPath volume. | |
| DirectoryOrCreate | If nothing exists at the given path, an empty directory will be created there as needed with permission set to 0755, having the same group and ownership with Kubelet. |
| Directory | A directory must exist at the given path |
| FileOrCreate | If nothing exists at the given path, an empty file will be created there as needed with permission set to 0644, having the same group and ownership with Kubelet. |
| File | A file must exist at the given path |
| Socket | A UNIX socket must exist at the given path |
| CharDevice | A character device must exist at the given path |
| BlockDevice | A block device must exist at the given path |
Persistent volume claim
The Persistent Volume Claim volume resource is used to mount a PersistentVolume into a Pod. PersistentVolume resources are a way for users to “claim” durable storage (such as a GCE PersistentDisk or an iSCSI volume) without knowing the details of the particular cloud environment.
The Persistent Volume Claim Name field must be set to the name of the PersistentVolumeClaim resource to be used.
For example, consider a PersistentVolumeClaim resource created with the following YAML:
apiVersion: v1
kind: PersistentVolumeClaim
metadata:
  name: mysql-pv-claim
  labels:
    app: wordpress
spec:
  accessModes:
    - ReadWriteOnce
  resources:
    requests:
      storage: 20Gi
The Persistent Volume Claim Name field would be set to mysql-pv-claim.
Raw YAML
Kubernetes supports a huge range of volume resources, and only a small number are exposed directly by the step user interface. Other volume resources can be defined as raw YAML.
The YAML entered must only include the details of the specific volume resource, and not include fields like name. For example, consider this example YAML provided by the Kubernetes documentation for the AWS EBS volume resource type:
apiVersion: v1
kind: Pod
metadata:
  name: test-ebs
spec:
  containers:
  - image: registry.k8s.io/test-web-server
    name: test-container
    volumeMounts:
    - mountPath: /test-ebs
      name: test-volume
  volumes:
  - name: test-volume
    awsElasticBlockStore:
      volumeID: <volume-id>
      fsType: ext4
The YAML from this example that can be included in the Raw YAML field is the awsElasticBlockStore key, meaning the YAML entered into the field is this:
awsElasticBlockStore:
  volumeID: <volume-id>
  fsType: ext4
Containers
The Containers section is where the Container resources are defined. This is where the bulk of the configuration for the Deployment resource is found.
The configuration options for a Container resource are broken down into a number of sections.
Image details
Each Container resource must reference a container image from a Docker feed.
The container image must have a name that consists of lower case alphanumeric characters or ’-’, and must start and end with an alphanumeric character.
The image is then selected from one of those available from the Docker feed.
If the Docker feed requires authentication, Octopus will automatically generated the required Secret resource as part of the deployment.
Ports
Each Container resource can expose multiple ports.
The port Name is optional. If it is specified, Service resources can refer to the port by its name.
The Port number is required and must be a number between 1 and 65535.
The Protocol is optional and will default to TCP.
Image pull policy
The image pull policy and the tag of the image affect when the kubelet attempts to pull the specified image.
If Not Present: the image is pulled only if it is not already present locally.Always: the image is pulled every time the pod is started.Defaultand either the image tag islatestor it is omitted: Always is applied.Defaultand the image tag is present but notlatest: If Not Present is applied.Never: the image is assumed to exist locally. No attempt is made to pull the image.
Container type
To support configuring and initializing Pod resources, Kubernetes has the concept of an Init Container resource. Init Container resources are run before App Container resources and are often used to run setup scripts.
For example, an Init Container resource may be used to set the permissions on a directory exposed by a PersistentVolumeClaim volume resource before the App Container resource is launched. This is especially useful when you do not manage the App Container resource image, and therefore can’t include such initialization directly into the image.
Selecting the Init container check-box configures the Container resource as an Init Container resource.
Resources
Each Container resource can request a minimum allocation of CPU and memory resources and set a maximum resource limit.
The requested resources must be available in the Kubernetes cluster, or else the Deployment resource will not succeed.
The resource limits allow a Container resource to burst up to the defined limits.
The CPU Request field defines the minimum CPU resources that the Container resource requires. The value is measured in CPU units. One CPU, in Kubernetes, is equivalent to:
- 1 AWS vCPU
- 1 GCP Core
- 1 Azure vCore
- 1 Hyperthread on a bare-metal Intel processor with Hyperthreading
Fractional values are allowed. A Container that requests 0.5 cpu is guaranteed half as much CPU as a Container that requests 1 cpu. You can use the suffix m to mean milli. For example 100m cpu, and 0.1 cpu are all the same. Precision finer than 1m is not allowed.
The CPU Limit field defines the maximum amount of CPU resources that the Container resource can use.
The Memory Request field defines the minimum amount of memory that the Container resource requires. The memory resource is measured in bytes. You can express memory as a plain integer or a fixed-point integer with one of these suffixes: E, P, T, G, M, K, Ei, Pi, Ti, Gi, Mi, Ki. For example, the following represent approximately the same value:
- 128974848
- 129e6
- 129M
- 123Mi
The Memory Limit field defines the maximum amount of memory that can be consumed by the Container resource.
Environment variables
Environment variables can be set three ways.
- Plain name/value pairs. These are defined by clicking the
Add Environment Variablebutton. TheNameis the environment variable name, and theValueis the environment variable value. - Expose a ConfigMap resource value as an environment variable. These are defined by clicking the
Add ConfigMap Environment Variablebutton. TheNameis the environment variable name. TheConfigMap Nameis the name of the ConfigMap resource. TheKeyis the ConfigMap resource key whose value is to be set as the environment variable value. - Expose a Secret resource value as an environment variable. These are defined by clicking the
Add Secret Environment Variablebutton. TheNameis the environment variable name. TheSecret Nameis the name of the Secret resource. TheKeyis the Secret resource key whose value is to be set as the environment variable value.
Volume mounts
In the Volumes section we defined the Volume resources that were exposed to the Container resource. It is here in the Volume Mounts container section that we map those Volume resources to the Container resource.
Each Volume Mount requires a unique Name.
The Mount Path is the path in the Container resource file system where the Volume resource will be mounted e.g. /data or /etc/my-app/config.
The Sub Path field is optional, and can be used to mount a sub directory exposed by the Volume resource. This is useful when a single Volume resource is shared between multiple Container resources, because it allows each Container resource to mount only the subdirectory it requires. For example, Volume resource may expose a directory structure like:
 - webserver
   - content
 - database
A Container resource hosting a web server would specify the Sub Path to be webserver/content, while a Container resource hosting a database would specify the Sub Path of database.
The Read Only field defines if the Volume resource is mounted in read only mode.
Some Volume resources like ConfigMap and Secret are always mounted in read only mode, regardless of the setting in the Read Only field.
See https://github.com/kubernetes/kubernetes/issues/62099 for more details.
Liveness probe
The Liveness probe resource configures a health check that is executed against the Container resource to verify that it is currently operational.
The Failure threshold defines how many times the probe can fail after the pod has been started. After this many failures, the pod is restarted. The default value is 3.
The Timeout defines the number of seconds after which the probe times out. The default value is 1 second.
The Initial delay defines the number of seconds to wait after the container has started before the probe is initiated.
The Period defines how frequently in seconds the probe is executed. The default value is 10.
The Liveness probe type defines the type of probe that is used to conduct the health check. Kubernetes supports three types of probes:
Command, newline-separated commands which are executed inside the container. If the return value is0, it is considered to be healthy.Http, which will execute a HTTP GET operation against a URL. If the request returns a status code between 200 and 399 inclusive it is considered healthy.TCP Socket, which will attempt to establish a connection against a TCP socket. If the connection can be established, it is considered healthy.
Command
The command probe type has one field, Health check commands that accepts a line break separated list of arguments. For example, if you want to run the command /opt/healthcheck my_service "an argument with a space", you would enter the following text into the Health check commands field:
/opt/healthcheck
my_service
an argument with a space
Http
The Http probe type has five fields.
The Host field defines the host to connect to. If not defined, this value will default to the IP address of the Pod resource.
The Path field defines the URL path that the HTTP GET request will be sent to.
The Scheme field defines the scheme of the URL that is requested. If not defined, this value defines to http.
The Port field defines the port that is requested. This value can be a number, like 80, or a IANA port name.
Additional HTTP headers can be defined by clicking the Add HTTP Header button. The Name is the HTTP header name, and the Value is the header value.
TCP socket
The TCP Socket probe type has two fields.
The Host field defines the host to connect to. If not defined, this value will default to the IP address of the Pod resource.
The Port field defines the port that is requested. This value can be a number, like 80, or a IANA port name.
Readiness probe
The Readiness probe resource configures a health check that is executed against the Container resource to verify that it has started correctly. Readiness probes are not supported by Init Container resources.
If defined, the readiness probe must succeed for a Blue/Green deployment to complete successfully. If the readiness probe fails, the Blue/Green deployment will halt at phase 3.
The Success threshold defines many consecutive times the probe must succeed for the container to be considered successful after a failure. The default value is 1.
The Failure threshold defines how many times the probe can fail after the pod has been started. After this many failures, the pod is marked Unready. The default value is 3.
The Timeout defines the number of seconds to wait for a probe response. The default value is 1 second.
The Initial delay defines the number of seconds to wait after the container has started before the probe is initiated.
The Period defines how frequently in seconds the probe is executed. The default value is 10.
The Liveness probe type defines the type of probe that is used to conduct the health check. Kubernetes supports three types of probes:
Command, which will execute a command inside the container. If the command returns0, it is considered to be healthy.Http, which will execute a HTTP GET operation against a URL. If the request returns a status code between 200 and 399 inclusive it is considered healthy.TCP Socket, which will attempt to establish a connection against a TCP socket. If the connection can be established, it is considered healthy.
Command
The command probe type has one field, Health check commands, that accepts a line break separated list of arguments. For example, if you want to run the command /opt/healthcheck my_service "an argument with a space", you would enter the following text into the Health check commands field:
/opt/healthcheck
my_service
an argument with a space
Http
The Http probe type has five fields.
The Host field defines the host to connect to. If not defined, this value will default to the IP address of the Pod resource.
The Path field defines the URL path that the HTTP GET request will be sent to.
The Scheme field defines the scheme of the URL that is requested. If not defined, this value defaults to http.
The Port field defines the port that is requested. This value can be a number, like 80, or a IANA port name.
Additional HTTP headers can be defined by clicking the Add HTTP Header button. The Name is the HTTP header name, and the Value is the header value.
TCP socket
The TCP socket probe type has two fields.
The Host field defines the host to connect to. If not defined, this value will default to the IP address of the Pod resource.
The Port field defines the port that is requested. This value can be a number, like 80, or a IANA port name.
Command
The command and arguments that are executed when a Container resource is launched can be defined or overridden in the Command section.
This section has two fields: Command and Command arguments. Each plays a slightly different role relating to how Docker images define the command that is used to launch the container.
Docker images can define an ENTRYPOINT, a CMD, or both.
When both are defined, the CMD value is passed to the ENTRYPOINT. So if CMD is set to ["hello", "world"] and ENTRYPOINT is set to ["print"], the resulting command would be print hello world.
If the Command field is specified, it will override the value of the Docker image ENTRYPOINT. So if the Command was set to echo, the resulting command would be echo hello world.
If the Command arguments field is specified, it will override the Docker image CMD. So if the Command arguments was set to hello Octopus then the resulting command would be print hello Octopus.
Each of these fields accepts multiple arguments separated by line breaks. For example, if you want to run the command /opt/my_app my_service "an argument with a space", you would enter the following text into the Command field:
/opt/my_appAnd the following into the Command arguments field:
my_service
an argument with a space
Startup probe
The Startup probe resource configures a health check that must complete before the Liveness probe begins. This is useful to accommodate any initial delay in booting a container.
If defined, the startup probe must succeed for a Blue/Green deployment to complete successfully. If the startup probe fails, the Blue/Green deployment will halt at phase 3.
The Success threshold defines many consecutive times the probe must succeed for the container to be considered successful after a failure. The default value is 1.
The Failure threshold defines how many times the probe can fail after the pod has been started. After this many failures, the pod is marked Unready. The default value is 3.
The Timeout defines the number of seconds to wait for a probe response. The default value is 1 second.
The Initial delay defines the number of seconds to wait after the container has started before the probe is initiated.
The Period defines how frequently in seconds the probe is executed. The default value is 10.
The Startup probe type defines the type of probe that is used to conduct the health check. Kubernetes supports three types of probes:
Command, which will execute a command inside the container. If the command returns0, it is considered to be healthy.Http, which will execute a HTTP GET operation against a URL. If the request returns a status code between 200 and 399 inclusive it is considered healthy.TCP Socket, which will attempt to establish a connection against a TCP socket. If the connection can be established, it is considered healthy.
Command
The command probe type has one field, Health check commands, that accepts a line break separated list of arguments. For example, if you want to run the command /opt/healthcheck my_service "an argument with a space", you would enter the following text into the Health check commands field:
/opt/healthcheck
my_service
an argument with a space
Http
The Http probe type has five fields.
The Host field defines the host to connect to. If not defined, this value will default to the IP address of the Pod resource.
The Path field defines the URL path that the HTTP GET request will be sent to.
The Scheme field defines the scheme of the URL that is requested. If not defined, this value defaults to http.
The Port field defines the port that is requested. This value can be a number, like 80, or a IANA port name.
Additional HTTP headers can be defined by clicking the Add HTTP Header button. The Name is the HTTP header name, and the Value is the header value.
TCP socket
The TCP socket probe type has two fields.
The Host field defines the host to connect to. If not defined, this value will default to the IP address of the Pod resource.
The Port field defines the port that is requested. This value can be a number, like 80, or a IANA port name.
Command
The command and arguments that are executed when a Container resource is launched can be defined or overridden in the Command section.
This section has two fields: Command and Command arguments. Each plays a slightly different role relating to how Docker images define the command that is used to launch the container.
Docker images can define an ENTRYPOINT, a CMD, or both.
When both are defined, the CMD value is passed to the ENTRYPOINT. So if CMD is set to ["hello", "world"] and ENTRYPOINT is set to ["print"], the resulting command would be print hello world.
If the Command field is specified, it will override the value of the Docker image ENTRYPOINT. So if the Command was set to echo, the resulting command would be echo hello world.
If the Command arguments field is specified, it will override the Docker image CMD. So if the Command arguments was set to hello Octopus then the resulting command would be print hello Octopus.
Each of these fields accepts multiple arguments separated by line breaks. For example, if you want to run the command /opt/my_app my_service "an argument with a space", you would enter the following text into the Command field:
/opt/my_appAnd the following into the Command arguments field:
my_service
an argument with a space
Pod security context
The Pod Security context section defines the container resource security context options.
The Allow privilege escalation section controls whether a process can gain more privileges than its parent process. Note that this field is implied when the Privileged option is enabled.
The Privileged section runs the container in privileged mode. Processes in privileged containers are essentially equivalent to root on the host.
The Read only root file system section determines whether this container has a read-only root filesystem.
The Run as non-root section indicates that the container must run as a non-root user.
The Run as user section defines the UID to run the entrypoint of the container process.
The Run as group section defines the GID to run the entrypoint of the container process.
Pod annotations
The Pod Annotations section defines the annotations that are added to the Deployment resource spec.template.metadata field. These annotations in turn are then applied to the Pod resource created by the Deployment resource.
For example, consider the Pod Annotations defined in the screenshot below.
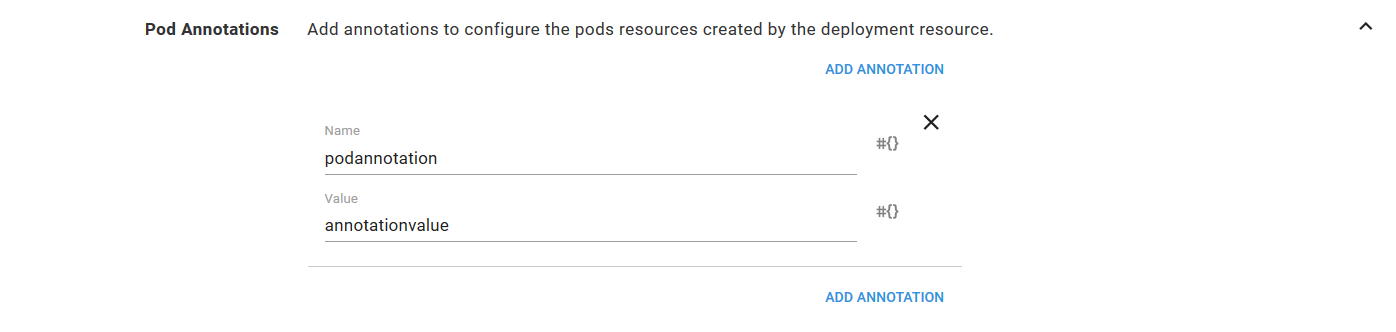
This will result in a Deployment resource YAML file something like this following.
apiVersion: apps/v1beta2
kind: Deployment
metadata:
  name: httpd
  labels:
    Octopus.Deployment.Id: deployments-10341
    Octopus.Step.Id: fead0da8-fd8a-4a03-9b70-5160cd378a8a
    Octopus.Environment.Id: environments-1
    Octopus.Deployment.Tenant.Id: untenanted
    Octopus.Kubernetes.DeploymentName: httpd
spec:
  replicas: 1
  selector:
    matchLabels:
      Octopus.Kubernetes.DeploymentName: httpd
  template:
    metadata:
      labels:
        Octopus.Deployment.Id: deployments-10341
        Octopus.Step.Id: fead0da8-fd8a-4a03-9b70-5160cd378a8a
        Octopus.Environment.Id: environments-1
        Octopus.Deployment.Tenant.Id: untenanted
        Octopus.Kubernetes.DeploymentName: httpd
      annotations:
        podannotation: "annotation_value"
    spec:
      containers:
      - name: httpd
        image: index.docker.io/httpd:2.4.35
        ports:
        - name: web
          containerPort: 80
        securityContext: {}
      imagePullSecrets:
      - name: octopus-feedcred-feeds-dockerhub-with-creds
  strategy:
    type: Recreate
In particular spec.template.metadata.annotations field has been populated with the pod annotations.
spec:
template:
metadata:
annotations:
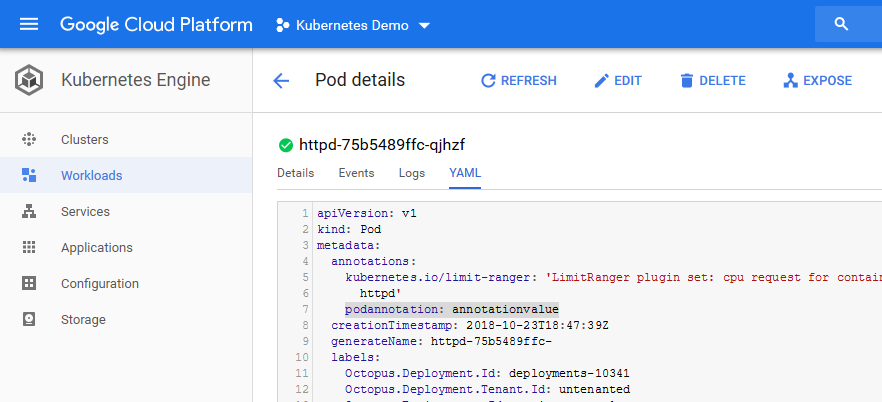
podannotation: "annotation_value"When this Deployment resource is deployed to a Kubernetes cluster, it will create a Pod resource with that annotation defined. In the screenshot below you can see the YAML representation of the Pod resource created by the Deployment resource has the same annotations.
Deployment annotations
The Deployment Annotations section defines the annotations that are added to the Deployment resource.
For example, consider the Pod Annotations defined in the screenshot below.
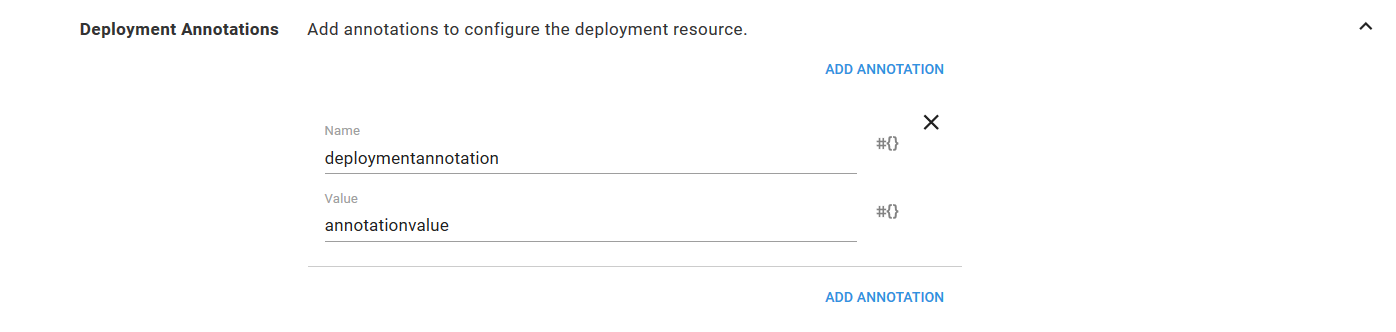
This will result in a Deployment resource YAML file something like this following.
apiVersion: apps/v1beta2
kind: Deployment
metadata:
  name: httpd
  labels:
    Octopus.Deployment.Id: deployments-10342
    Octopus.Step.Id: fead0da8-fd8a-4a03-9b70-5160cd378a8a
    Octopus.Environment.Id: environments-1
    Octopus.Deployment.Tenant.Id: untenanted
    Octopus.Kubernetes.DeploymentName: httpd
  annotations:
    deploymentannotation: "annotation_value"
spec:
  replicas: 1
  selector:
    matchLabels:
      Octopus.Kubernetes.DeploymentName: httpd
  template:
    metadata:
      labels:
        Octopus.Deployment.Id: deployments-10342
        Octopus.Step.Id: fead0da8-fd8a-4a03-9b70-5160cd378a8a
        Octopus.Environment.Id: environments-1
        Octopus.Deployment.Tenant.Id: untenanted
        Octopus.Kubernetes.DeploymentName: httpd
    spec:
      containers:
      - name: httpd
        image: index.docker.io/httpd:2.4.35
        ports:
        - name: web
          containerPort: 80
        securityContext: {}
      imagePullSecrets:
      - name: octopus-feedcred-feeds-dockerhub-with-creds
  strategy:
    type: Recreate
In particular metadata.annotations field has been populated with the pod annotations.
metadata:
  annotations:
    deploymentannotation: "annotation_value"
Custom resources YAML
When deploying a Kubernetes Deployment resource, it can be useful to have other Kubernetes resources tied to the Deployment resource lifecycle.
The Deploy Kubernetes containers step already deploys ConfigMap and Secret resources in a tightly coupled fashion with their associated Deployment resource. Doing so means the containers in a Deployment resource can reliably reference a ConfigMap or Secret resource during an update, and will not be left in an inconsistent state where a new ConfigMap or Secret resource is referenced by an old Container resource.
Once a Deployment resource is fully deployed and healthy, these old ConfigMap and Secret resources are cleaned up automatically.
There are other resources that benefit from being part of this lifecycle. For example, a NetworkPolicy resource may be created with each deployment selecting the Pod resources that were part of the deployment. Or you may have custom resource definitions that are specific to your own local Kubernetes cluster.
The Custom resource YAML section allows additional Kubernetes resources to participate in the lifecycle of the Deployment resource. It works like this:
- You define the YAML of one or more Kubernetes resources in the code editor. The editor accepts multiple YAML documents separated by a triple dash e.g.
apiVersion: networking.k8s.io/v1
kind: NetworkPolicy
metadata:
  name: test-network-policy
spec:
  podSelector:
    matchLabels:
      Octopus.Kubernetes.DeploymentName: "#{Octopus.Action.KubernetesContainers.ComputedDeploymentName}"
  policyTypes:
  - Ingress
  - Egress
  ingress:
  - from:
    - ipBlock:
        cidr: 172.17.0.0/16
        except:
        - 172.17.1.0/24
    - namespaceSelector:
        matchLabels:
          project: my-project
    - podSelector:
        matchLabels:
          role: frontend
    ports:
    - protocol: TCP
      port: 6379
  egress:
  - to:
    - ipBlock:
        cidr: 10.0.0.0/24
    ports:
    - protocol: TCP
      port: 5978
---
apiVersion: v1
data:
  allowed: '"true"'
  enemies: aliens
  lives: "3"
kind: ConfigMap
metadata:
name: game-config-env-file- During the deployment, each resource will be modified to ensure that it has a unique name, and includes the common labels that are applied to all other resources created as part of the step. For example, the name of NetworkPolicy resource will be changed from the value entered into the YAML of
test-network-policysomething liketest-network-policy-deployment-1234. The NetworkPolicy resource will also have labels likeOctopus.Deployment.Id,Octopus.Deployment.Tenant.Id,Octopus.Environment.Id,Octopus.Kubernetes.DeploymentNameandOctopus.Step.Idapplied. These labels allow Octopus to track the resource across deployments. - Once the deployment has succeeded, any old resources of the kinds that were defined in the
Custom resource YAMLfield will be found and deleted. For example, anyNetworkPolicyorConfigMapresources in the target namespace created by a previous deployment will be deleted.
By creating each custom resource with a unique name and common labels, Octopus will ensure that a new resource is created with each deployment, and old resources are cleaned up. This means that the custom resources are tightly coupled to a Deployment resource, and can be treated as a single deployment.
To deploy resources that are not bound to the lifecycle of the Deployment resource, use an additional step such as the Run a kubectl CLI Script or Deploy raw Kubernetes YAML step.
Service
The Service feature creates a Service resource that directs traffic to the Pod resources configured by the Deployment section. Although the Deployment and Service resources are separate objects in Kubernetes, they are treated as a single deployment by the Deploy Kubernetes Container step, resulting in the Service resource always directing traffic to the Pod resources created by the associated Deployment resource.
Service name
Each Service resource requires a unique name, defined in the Name field.
The Service resource name is not affected by the deployment strategy.
Service type
A Service resource can be one of three different types:
- Cluster IP
- Node Port
- Load Balancer
Cluster IP
A Cluster IP Service resource provides a private IP address that applications deployed within the Kubernetes cluster can use to access other Pod resources.

Node port
A Node Port Service resource provides the same internal IP address that a Cluster IP Service resource does. In addition, it creates a port on each Kubernetes node that directs traffic to the Service resource. This makes the service accessible from any node, and if the nodes have public IP addresses then the Node Port Service resource is also publicly accessible.

Load balancer
A Load Balancer Service resource provides the same Cluster IP and Node Ports that the other two service resources provide. In addition, it will create a cloud load balancer that directs traffic to the node ports.
The particular load balancer that is created depends on the environment in which the LoadBalancer Service resource is created. In AWS, an ELB or ALB can be created. Azure or Google Cloud will create their respective load balancers.

Cluster IP address
The Cluster IP Address field can be used to optionally assign a fixed internal IP address to the Service resource.
Ports
Each port exposed by the Service resource has four common fields: Name, Port, Target Port and Protocol.
The Name field assigns an optional name to the port. This name can be used by Ingress resource objects.
The Port field defines the internal port on the Service resource that internal applications can use.
The Target Port field defines the name or number of the port exposed by a container.
The Protocol field defines the protocol exposed by the port. It can be TCP or UDP.
If the Service resource is a NodePort or LoadBalancer, then there is an additional optional Node Port field that defines the port exposed on the nodes that direct traffic to the Service resource. If not defined, a port number will be automatically assigned.

Ingress
The Ingress feature is used to create an Ingress resource. Ingress resources provide a way to direct HTTP traffic to Service resources based on the requested host and path.
Ingress name
Each Ingress resource must have a unique name, defined in the Ingress name field.
The name of the ingress resource is not affected by the deployment strategy.
Ingress class name
Starting with Kubernetes 1.18, the ingress controller that implements ingress rules is defined in the Ingress Class Name field.
See the Kubernetes documentation for more information.
Ingress host rules
Ingress resources configure routes based on the host that the request was sent to. New hosts can be added by clicking the Add Host Rule button.
The Host field defines the host where the request was sent to. This field is optional and if left blank will match all hosts.
The Add Path button adds a new mapping between a request path and the Service resource port. The Path field is the path of the request to match. It must start with a /. The Service Port field is the port from the associated Service resource that the traffic will be sent to.
Ingress annotations
Ingress resources only provide configuration. An Ingress Controller resource uses the Ingress configuration to direct network traffic within the Kubernetes cluster.
There are many Ingress Controller resources available. NGINX is a popular option, that is used by the Azure AKS service. Google Cloud provides its own Ingress Controller resource. A third party Ingress Controller resource is available for AWS making use of the ALB service.
The diagram below shows a typical configuration with Ingress and Ingress Controller resources.

There is no standard behavior to the creation of load balancers when configuring Ingress Controller resources.
For example, the Google Cloud Ingress Controller will create a new load balancer for every Ingress resource. The documentation suggests to create a single Ingress resource to achieve a fan-out pattern that shares a single load balancer. This can be achieved using the Deploy Kubernetes ingress resource step.
On the other hand, the NGINX Ingress Controller resource installation procedure creates a single LoadBalancer Service resource that is shared by default.
Each of these different implementations is configured through the Ingress resource annotations. Annotations are key value pairs, and the values assigned to them depend on the Ingress resource that is being configured. The list below links to the documentation that describes the supported annotations.
A new annotation is defined by clicking the Add Annotation button.
The Name field will provide suggested annotation names, but this list of suggestions is not exhaustive, and any name can be added.
The Value field defines the annotation value.
Annotation values are always considered to be strings. See this GitHub issue for more information.
ConfigMap and secret
It is often convenient to have settings saved in ConfigMap and Secret resources that are tightly coupled to the Deployment resource. Ensuring each version of a Deployment resource has its own ConfigMap or Secret resource means that deployments are not left in an inconsistent state as new Deployments resources are rolled out alongside existing Deployment resources, which is the case for both the Rolling Update and Blue/Green deployment strategies.
The ConfigMap and Secret features are used to create ConfigMap and Secret resources that are created with the associated Deployment resource, and cleaned up once a Deployment resource has been replaced.
Like the Custom Resource feature, the ConfigMap and Secret features achieve this by creating resources with unique names for each deployment. The resources have a set of labels applied that allows Octopus to manage them during a deployment.
Custom ConfigMap and secret names
By default, the ConfigMap and Secret resources created by this step have unique names generated by appending the ID of the deployment. For example, a ConfigMap may be defined in the step with the name of my-app-settings, and it will be created in the Kubernetes cluster with the name of my-app-setting-deployment-1234, where deployment-1234 is the ID of the Octopus deployment as a lower case string.
The templates used to generate these names can be defined with the following variables:
Octopus.Action.KubernetesContainers.ConfigMapNameTemplateOctopus.Action.KubernetesContainers.SecretNameTemplate
The values assigned to these variables will then be used to generate the names of the ConfigMap and Secret resources created by the step. By default, these are the templates that are used to generate the unique names:
#{Octopus.Action.KubernetesContainers.ConfigMapName}-#{Octopus.Deployment.Id | ToLower}#{Octopus.Action.KubernetesContainers.SecretName}-#{Octopus.Deployment.Id | ToLower}
For example, to change the name assigned to the ConfigMap resource to include the time of deployment instead of the deployment ID, you can set the Octopus.Action.KubernetesContainers.ConfigMapNameTemplate variable to #{Octopus.Action.KubernetesContainers.ConfigMapName}-#{ | NowDate "HH-mm-ss-dd-MMM-yyyy" | ToLower}
Learn more
- Generate an Octopus guide for Kubernetes and the rest of your CI/CD pipeline
- Kubernetes blog posts
Help us continuously improve
Please let us know if you have any feedback about this page.
Page updated on Sunday, January 1, 2023