

In our recent webinar, Clear Measure’s Chris Thomas joined Derek Campbell to talk about ways to optimize Octopus Deploy for the best possible experience.
With a little planning, maintenance and smart use of its features, you can keep Octopus running smoothly and make it easier to see what’s happening.
Watch the webinar below or keep scrolling for the webinar’s key insights.
Database maintenance
As Chris notes in the webinar, it’s easy to forget Octopus Server runs on a SQL database. Some basic housekeeping with tools like Microsoft SQL Server Management Studio (SSMS) can boost speed for those battling a slow instance.
If you’re on Octopus Cloud, database maintenance is something you never need to worry about. Skip ahead for how to best organize Octopus instead.
Check SQL reports for problems
First, we recommend running an ‘Index Physical Statistics’ report in SSMS to look for problems.
To run the report, right-click your database from the list and select Reports ➜ Standard Reports ➜ Index Physical Statistics.
After the report has opened, check the Operation Recommended column for suggestions.
You can also expand items in the # Partitions column to see fragmentation information.
- If fragmentation is over 35% you should schedule some time to defragment the database.
- Anything under 30% is usually okay, but there’s room for improvement as the percentage increases.
Set a maintenance plan
You can use SSMS's SQL Server Maintenance Plan Wizard to optimize and maintain your SQL database.
Expand the Management folder in the left pane, right-click Maintenance Plan and select Maintenance Plan Wizard.
Set the plan to run on a schedule that suits your business and select the following maintenance tasks:
- Check Database Integrity
- Reorganize Index
- Rebuild Index
- Update Statistics
Use others if needed, though we advise against shrinking the database for performance reasons.
As you progress through the wizard, you may want to change settings for each chosen task. We find the defaults are enough, but you can change things as you need.
Run the maintenance plan once you’re happy.
If you prefer using scripts, try Ola Hallengren’s SQL Server maintenance solution, which achieves everything we outlined above.
Organize Octopus
Keeping Octopus well organized not only helps performance, but also makes it easier for teams to read and navigate the dashboard. Here are a few suggestions to keep your dashboard lean and easy to navigate.
Don’t use more environments than you need
While you can create many environments, your environment number should mirror your development pipeline (Dev, QA, Staging, UAT and Production, for example).
We advise using fewer than 10 environments to reduce:
- Performance problems
- Project redundancy and overlap
- Unnecessary clutter on the dashboard

We find some customers use more environments than needed to manage lots of projects or deployment targets. Octopus includes better options, such as Project groups and Tenants.
Group your projects
If you have many Projects, you can group them to help reduce visual noise on your dashboard.

To create a project group:
- Click Projects in Octopus’s top menu.
- Click ADD GROUP in the top right.
- Give your group a name and description, then click SAVE.
To add an existing project to a group:
- Click Projects in Octopus’s top menu.
- Click on the project you need to move to the new group.
- Click Settings at the bottom of the left menu.
- Click Project Group, then select the destination group from the Project group dropdown menu.
To add a new project to a group:
- Click Projects in Octopus’s top menu.
- Click ADD PROJECT in the top right.
- Give your new project a name and click SHOW ADVANCED.
- Select a group from the Project group dropdown menu.
- Click SAVE to finish creating your new project.
Use Tenants
We designed Tenants to help customers who deliver Software as a Service (SaaS), but they’re also useful to organize things like:
- Geographical regions or data centers
- Developers, testers or teams
- Feature branches
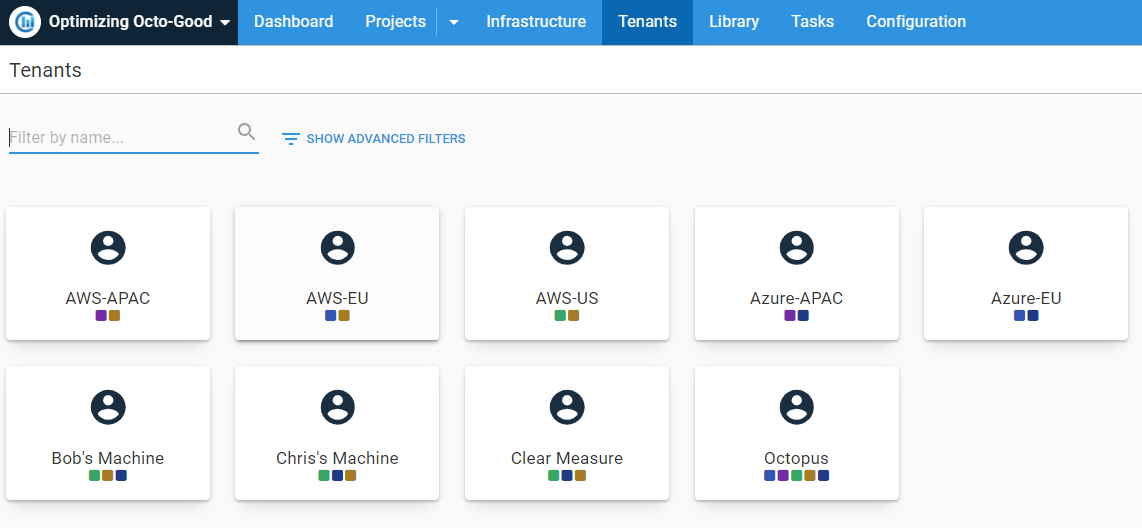
Check out our documentation on Tenants for more information.
Also, watch our follow-up webinar with Adam Close and Mark Harrison, Better multi-tenancy deployments using Octopus Deploy.
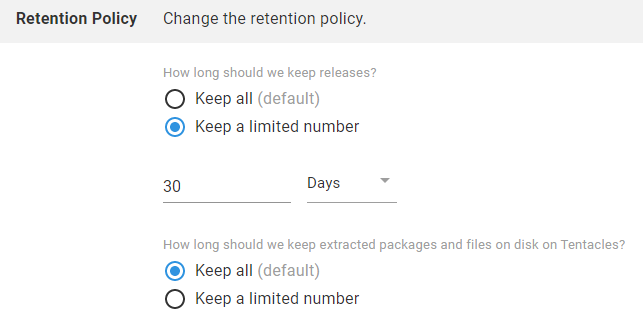
Delete your old releases and builds
It’s great practice to delete anything you no longer need from Octopus. Octopus Server is set to keep everything by default (Octopus Cloud defaults to 30 days), but you can use Lifecycle retention policies to auto-prune old releases and builds.
To check your retention policies:
- Click Library in Octopus’s top menu.
- Click Lifecycles from the left menu.
Here you can change retention policies for existing and default Lifecycles, or create new ones.
By setting retention policies, Octopus will delete the files after the number of days or releases you set, saving you valuable disk space.
See our documentation for more detail on:
What next?
For more help, you can look through the Octopus Deploy documentation or you're welcome to reach out via our support channels.
Happy deployments!


